Tuesday, December 23, 2008

Happy Birthday Stamp a Stack!

On January 5th at 7pm and on January 10th at 11am I will be holding a Birthday Card Stamp a stack. When talking with my club girls I learned that they wanted more general and man cards so here is what I came up with...Email me by January 2nd if you would like to join us!! More details and cost can be found on my demonstrator site: www.kimberlym.stampinup.net


Loads of Love Red Truck

Birthday Balloons (wishing you the HAPPIEST birthday yet) on the inside


My new favorite set! Inspired by Nature Grass Birthday

Cupcake Birthday!


B is for Birthday!


Friday, December 19, 2008

Technique Tuesday!

Here are this month and last month's technique Tuesday Cards!
I know, I know I am slacking...I am trying to do better on the blogging front! :-) I am bad about taking pictures of my own kid so you see where the cards fall...way behind!!! :-)


December's Cards!

Faux Rimmed Tag!

I saw this guy on a blog I believe and can't seem to figure out where. The original card had a real metal tag hanging on it. I thought I would use SCS's tutorial to make a faux metal tag! How cute is this and super simple!!


Stamps: Under the Stars, Family Phrases, and Polka Dot Background
Ink: Basic Black, Real Red, Versamark
Paper: Riding Hood Red, Chocolate Chip, Silver, Whisper White, Old Olive
Accessories: 2 way glue, 1 1/4" circle, 1 3/8 circle, Alpine Ribbon, Paper piercer, linen thread, hole punch, water color crayons, blender pens

The hearts were created using the Happy Heart Day Butterfly stamp...


Ribbon Weaving
This is yet another card that I saw that "FORCED" me to buy something else. I got the idea from Stephanie Hargis. I loved the layout I saw for this card as well as the paper and ribbon. I bought the paper and ribbon just to make this card. (Do you sense a destructive pattern growing?) I decided to add my own touch with the ribbon weaving technique.

Stamps: Say it with Scallops
Ink: Kiwi Kiss
Paper: Chocolate Chip, Hawaiian Papaya, Tangerine Tango
Accessories: Tangerine Tango ribbon, Chocolate chip ribbon, Scallop Square punch, glue dots


Faux Alligator Skin
I got the idea for this guy from Jamie Hurley
This was a messy but fun technique. I had embossing powder all over my counter! :-)

Stamps: Wild About You
Paper: Green Galore, Basic Black, Whisper White
Ink: Versamark, Basic Black, Green Galore
Accessories: Basic Black Ribbon, ticket punch, bone folder, heat gun, clear embossing powder

These are two of three cards we created for November's Technique Tuesday. I forgot to take a picture of number three before it got mailed out....I think! :-)

Faux Snow/Icing Technique
Stamp: Merry and Bright
Ink: Basic Black, Bashful Blue
Paper: Hawaiian Papaya, Real Red, Chocolate, Whisper White
Accessories: markers, 5/8" grosgrain ribbon, flour, water, salt, 2 way glue, dazzling diamonds

Scallop Medallion
This technique uses the scallop edge punch to create a medallion look!
Stamps: Flower for all Seasons, Happy birthday
Paper: Kraft, Handsome Hunter, Burgundy, whisper white
Ink: Basic Black, handsome hunter
Accessories: Scallop edge punch, 1/4" burgundy ribbon


Thursday, December 18, 2008

Club Meeting!

December's Club meeting is tonight!! Here are the cards we are creating!


Top Note Christmas
Stamps: A Tree for All Seasons (retiring, 10% off until Dec 23rd!), All Holidays
Paper: Chocolate chip, Whisper White, Really Red
Ink: Chocolate chip
Accessories: Big Shot, Top Note Die, Chocolate chip 1/4" grosgrain, red and chocolate chip markers


Flight of the Butterfly!
You can get this stamp and the Kind Thanks set 20% off this month if you spend $20!
I got the inspiration for this card from abigailadrienne.
I even bought the wide oval punch and Rose Red grosgrain just to make this card!

Stamps: Flight of the Butterfly, Kind Thanks
Paper: Pink Pirouette, Rose Red, Whisper White
Ink: Rose Red, Pink Pirouette, Mellow Moss
Accessories: Wide Oval Punch, Corner rounder, crystal effects

Crazy for Cupcakes

I am very behind on sharing cards so WATCH OUT! :-) I am going to catch up! Here are some cards I created using Crazy for Cupcakes. Some of the cards I cased from Splitcoast so if is yours I will try to give credit but if I don't please let me know so I can give you credit!


This one is my favorite I think!
I got the idea for this card from stampingholly on splitcoast. I changed the colors to suit the ribbon that I had. I chose So Saffron, Chocolate Chip and Riding Hood Red. I colored the cup cake bases in Close to Cocoa...yummy!


A step out of the color comfort zone...
I got the idea for this card from Happy to Stamp Forever on Splitcoast. I changed the ribbon and the background a little. I used Old Olive, Basic Gray, Pumpkin Pie and Basic Black for this card. The cupcake is watercolored with aquapainter and ink pads.


Cupcakes with Faux Icing!!


I got the idea for this card from jenpeel. On the first cupcake card I used the faux icing technique. It was a more difficult card to make but a lot of fun. The second card uses dazzling diamonds and 2 way glue for the icing. The bottom of the card was wheeled with the cupcake wheel.

Keep watching....I have a birthday stamp a stack coming on January 5th and 10th...

Thursday, December 4, 2008

The Anatomy of a Christmas Card!

I promise I have not dropped off the face of the planet! I don't know what happened to November but it is gone. :-) We have been busy around here getting all set up for Christmas, making Christmas cards and baking cookies! YUMMM!

Each year we create our own Christmas cards and here is this years winner! We created 80 of these little guys and then our Christmas list kept growing so we had to send out my other awesome homemade cards. So if you didn't get Mr. Snowman never fear you got one of my other awesome creations...now on to how we created so many cards.
***note: I did say "WE"...my awesome hubby helped put these cards together!

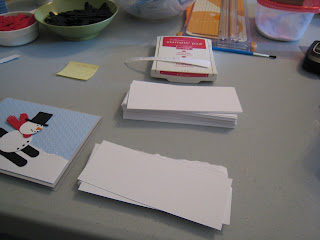
Here is the mess! We started off punching the pieces to the snowman body and putting them in containers, which my son so generously donated from his kitchen.

Stack of Bashful Blue pieces that hubby embossed in my Big Shot using the Cuttlebug Swiss Dots folder (**don't fall over, I know it isn't Stampin' Up!. Hopefully they will catch up soon!)

My job: Tearing strips of paper for the "snow"

The bucket of noses (small star punch with the points cut off), 2 way glue to pick them up, the black marker for the faces, a bucket of 3/4" squares for the hat and strips of black to be cut from the 1 1/4" square for the brim.

Word Window punch for the skis and the scarves. I used my paper snips to snip the edges of the red to make them look more like real scarves.

A closer look at the noses...
Trash bucket, not sure what Rachel Ray calls it on her cooking show but my stamping has one as well. My son kept coming and dumping it for us. Also note the diet sodas on either side and the massive T.V. in front of us! We took over the living room for several days watching Christmas movies and making cards. The paint brush was a must have for brushing the extra glitter off the card. **Note: I have glitter permanently all over my house now and my car!!!!


The final card! Hubby put together the snowmen and then I glittered and glued down the rest.

Stamps: Holiday's and Wishes, God's Blessings (inside sentiment)
Ink: Real Red, Bashful Blue
Paper: Silver, Whisper White, Real Red, Bashful Blue, Basic Black, Pumpkin Pie
Accessories: Small Star punch, word window punch, 1 3/8 circle, 1" circle, 3/4" square, 1 1/4" square, marker, 2 way glue, dazzling diamonds, sponge (for the snow)

I am love, loving the punch art so if you have a cool punch art creation please share it! I would love to see what you have created with your punches!

Merry Christmas and Happy Stamping!

Google Search

Google

Leelou Blogs